Tuesday, January 12, 2016

Eggless cake in Pressure Cooker

Dear friends,

I have been MIA in this blog for almost a year. Have been experimenting many recipes, but couldn't take pictures or type the recipes. Hope this year I will start a fresh with more post in my food blog too.

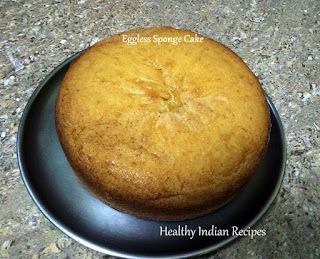
I am today here to share you the recipe of Eggless sponge cake made in pressure cooker.

This is my 8th attempt of doing a cake. Have tried cakes without using the oven in many ways by steaming, using water in P. C, pan type, with an empty Pressure cooker and finally got this fluffy sponge cake made through pressure cooker filled with sand.


Ingredients:
  1. Butter  - 1/2 cup should be at room temperature (normal cooking oil can be used instead of butter)
  2. Maida - 1 cup
  3. Milk - 1/2 cup
  4. Sugar - 6 tbsp
  5. Condensed Milk - 4 tbsp
  6. Vanilla essence - 1 teaspoon
  7. Apple cider vinegar - 1 teaspoon(1/2 cup curd can be added if you don't have vinegar)
  8. Baking powder - 1 teaspoon
  9. Baking soda - 1 teaspoon
Directions:

Setting Pressure Cooker to prepare cake
  • Fill the pressure cooker base with sand inside (1 inch level to be filled)and place the separator plate over it and preheat the cooker at high flame with lid covered(no gasket and no whistle) for about 15 mins.
Separator plate
To prepare Cake Batter
  1. Powder the sugar in mixer jar 
  2. Add butter to the sugar and run the mixer for 1 minute(if you have hand blender you have avoid using mixie)
  3. Now add condensed milk and milk to it and press the pulsator three to four time so that it blends well.
  4. Now empty the mixed content to a big bowl and add vanilla extract and vinegar and beat with a ladle at a time. 
  5. Sieve the flour together with baking powder and baking soda. 
  6. Slowly add the flour mixture and beat after each addition until all of the flour is mixed well without lumps( consistency should be in between idli and dosa batter - not too thick or thin)
  7. Now grease the aluminum pan (which you get along with cooker) with butter and dust it with maida.
  8. Pour the batter into the pan and spread it evenly
  9. Now open the cooker carefully and place the pan on the separator plate and close the lid.
  10. Reduce the flame to medium and allow it cook for 50 minutes.
  11. Insert a thin knife in the center of the cake if it comes out clean, your cake is ready.
  12. Switch off the flame and allow for 10 minutes and then open the lid.
  13. You can see the puffed up cake inside the pan and take it out with the help of holder as the sides of the cooker will be very hot and allow the cake to cool for 2 minutes and gently tap off on a plate. it will come out easily.
  14. Garnish it with powdered sugar or eat as it is.

Friday, November 14, 2014

Manathakkali Keerai Chutney

Hi Friends,

My Today's post is on Manathakkali Keerai chutney (Black Nightshade Chutney).(Botanical name- Solanum nigrum)

Manathakkali Keerai health benefits are enormous. It cures many stomach related problems, ulcer and piles. It improves digestion and best food during pregnancy.

Many dishes are made out of this keerai. I have tried chutney out of this.

Ingredients:

  • Small onion - 1 cup
  • Urad dhal - 2 tbsp
  • Manathakkali Keerai - 2 Cups
  • Garlic - 5 Pods 
  • Coconut - 2 teaspoon (optional)
  • Red chillies - 3-5 Nos
  • Tamarind - gooseberry size
  • Oil - 1 teaspoon

To Saute:

  • Oil - 1/2 teaspoon
  • Mustard seeds - 1/4 teaspoon
  • Red chilles - 2 Nos
  • Urad dhal - 1 teaspoon
  • Asafoetida - a pinch
  • Curry leaves - a few 
  • Chopped Onion - few


Method:

  1. Heat the kadai and add few drop of oil. When it is hot add urad dhal, red chilli and fry till dhal is brown in color and keep aside.
  2. In the same kadai add some oil and add small onion, garlic and fry until it becomes translucent.
  3. Now add keerai, salt, tamarind and fry until the raw smell goes off.
  4. Now add coconut to it and fry for a minute and switch off the flame and allow it to cool.
  5. Add all fried ingredients to the mixie/blender and grind it into a smooth paste.
  6. Heat the kadai and add the oil and add items one by one under To saute. and fry well and add to the chutney mix.
  7. It goes well with Idli, Dosa and rice.


Happy Cooking

Thursday, November 6, 2014

Pirandai Thuvaiyal

Dear Friends,

My todays post is on Pirandai Thuvaiyal / Pirandai Chutney - It is a famous recipe of our Tamilnadu parampariya samayal.

Pirandai in english - Cissus quadrangularis. It is a painkiller and has been used extensively in Siddha medicine. It is used to increase appetite. 

Courtesy: Mooligai sithar blog
Ingredients:
Pirandai  - 1 cup
Red chilli  - 3-4
Peppercorns - 5 to 6 Nos
Urad dal  - 3 tbsp
Grated Coconut - 3 tbsp
Tamarind  - small marble size
Salt   - to taste
Ghee - 1 tsp

To saute:
Mustard  - ½ tsp
Asafoetida - ¼ tsp
Oil   - 1 tsp

Method:

  1. Clean and wash pirandai. Remove the thick fibre on the four corners of the stem and chop into small pieces.
  2. In a kadai, heat one teaspoon of ghee and saute the pirandai for 6 to 7 minutes in low flame. Remove from stove and keep aside for cooling.
  3. In the same kadai, heat 1/2 tsp of oil and add urad dhal, peppercorns, red chilles,tamarind and fry it until the urad dhal changes into light brown colour. Now switch off the stove and allow it to cool.
  4. Now grind all the ingredients along with fresh coconut and salt and finally add pirandai and grind it well.
  5. Saute the items under To Saute and add to the grounded chutney.
  6. Pirandai Chutney is ready and goes well with hot rice & gingely oil


Pirandai is good source of fibre and cures joint pains and digestion problems.

Thanks for visiting.

Wednesday, October 29, 2014

Kambu Appam / Pearl Millet Appam

Dear friends,

I have been MIA in my recipes blog. Here is my post on Kambu recipes.

Pearl Millet / Kambu - Rich source of phosphorus, which plays an important part in the structure of body cells. Phosphorus, found in pearl millets, is a significant component of several necessary compounds including adenosine triphosphate (ATP). This element is also a crucial component of nucleic acids, which are the building blocks of the genetic code. Phosphorus is a constituent of lipid-containing structures such as cell membranes and nervous system structures.

Here is my recipe on how to make Kambu Appam.

Ingredients

To Soak & grind
Pearl Millet/ Kambu / Bajra - 1 1/2 cup
Pachaarusi/ Raw Rice - 1
Par boiled rice - 1/4 cup
Urad dal (whole ) - 1 tbsp
Fenugreek seeds - 10 no
Shredded coconut - 2 tbsp

To Mix
Salt - to taste
Baking Soda - optional

Method

  • Wash and soak all the items under Soak & grind for 5 to 6 hours.
  • Grind the soaked pearl millet,rice and dal along with the shredded coconut. 
  • The batter should be of smooth paste consistency and thin when compared to normal dosa batter.
  • Mix salt & store the batter in vessel and allow it to ferment overnight.
  • If you want to use baking soda, add it to the batter 10 minutes before cooking.
  • Keep the appam pan on the stove in medium heat , brush it with a little oil and pour one ladle of the batter to the center of the pan and take the pan and make a swirl to spread the bread to appam shape. Cover it with a lid to let it cook for 2-3 minutes.
  • Once the center of the appam it cooked, remove it from the pan.


Serve hot with coconut chutney and sambhar. Best food for Diabetes.

Health Benefits of Pearl Millet / Kambu / Bajra

Millets are a great source of starch, making it a high-energy food. It is also an excellent source of protein and fiber. It is said that the amino acids in the pearl millet are more easily digestible than the ones found in wheat.

Millets contain an essential phytonutrient, lignin, which is very beneficial for the human body. With the help of natural flora, lignans get converted to mammalian lignans and they fight against hormone-dependent cancers and reduce the risk of cardiac arrests.

Consumption of pearl millets helps in minimizing the risk of type 2 diabetes. Being a good source of magnesium, millets act as a cofactor in a number of enzymatic reactions.

Thanks for visiting

Thursday, October 24, 2013

Carrot chutney

Hi friends,

Carrot chutney - was one of long pending dish to experiment.  Bought some fresh carrots from groccessories today  which tempted me to try this.

Ingredients:

Carrot - 2 nos
Coconut - 2 tbsp
Peanuts - 2 tbsp
Fried gram - 1/2 tbsp
Urad dhal - 2 tbsp
Tamarind - small gooseberry size
Dry chilles - 3 Nos
Asafoetida - a pinch
Salt - to taste
Oil - 2 tbsp

For tadka:
Mustard - 1 tsp
urad dhal - 1 tsp
Curry leaf - a few

Method:
  1. In a kadai, heat 1 tsp of oil and fry urad dhal, peanut, coconut, asafoetida  and red chilli until it turns golden brown and keep it aside
  2. In the same pan heat 1 tsp of oil and fry the grated carrots for few minutes until the raw smell goes off. 
  3. Allow it to cool and grind this with slat , tamarind and a few water.
  4. Now heat 1 tsp of oil and add items under tadka one by one and add to the chutney
  5. Yummy chutney is ready and goes well with dosa and idli

Thanks for Visiting

Monday, October 21, 2013

Varagu Rice Vegetable bath / upma

Dear friends,

I have been MIA for a very long time in my cooking blog. Mr Craft blog kept me busy and i felt lazy to write the recipe(open to agree).

Varagu rice is a habitat crop of our ancient South India and it has high source of Protein, Calcium, fiber and Minerals. It can reduce body weight. Varagu increases Liver functionality and good for lympatic disorder.

You can make anything with this Pongal, fried rice, upma and many more. one can't forget the taste of Varugu Rice Pongal. it is yummy, will post the recipe soon on this.

Here is post on a health dish - Varagu rice upma / Kodo millet upma.

Ingredients:
Varugu Rice - 2 cups
Mixed veggies - 1 cup(carrrot, beans, peas)
Big Onion  - 1 no
Ginger - 1/2 inch
Green chilli - 3 Nos
Curry leaf - a few
For tadka - mustard, urad dhall
Asofoetida - a pinch
Salt for taste
Oil for seasoning

Method:


  1. Dry roast the varagu rice like rawa. Keep aside. 
  2. Heat the oil in a pressure cooker and add the mustard seeds, urad dal, green chillies and curry leaves. 
  3. Fry for while and add the asafoetida, ginger and onions and sauté till the onions become translucent. 
  4. Add the vegetables along with Varugu rice and add 2 ½ cup of water and pressure cook it for 2~3 whistle.
  5. Serve hot with Coconut chutney


It will taste yummy 

Health Benefits;
  • It is rich in fiber
  • It has high antioxidant properties
  • It helps to control Blood sugar and Cholesterol
  • It is rich in Magnesium, Calcium, Tryptophan,Phoshorus, Fiber, B vitamins
Thanks for visiting

Friday, April 5, 2013

Raw Papaya Morkuzhambu

Hi friends,
 
I think this might sound awww on seeing Raw papaya. But it tasted yummy. We are forced to cut down our papaya tree two days back. I was left with no option other to nod my head :( . I felt very sad on that day as it was associated with me from seed stage. It gave us plenty of fruits for last three years and even at the last day of it survival. There were many raw papayas. Hence decided to try it in Morkuzhambu.
 
Here is my recipe
 
Ingredients:
  • Diced papaya - 1 cup 
  • Sour curd - 1 cup
  • Small onion  - 6 nos (chopped finely)
  • Tomato chopped - 3 tbsp
To Grind:
  • Coconut - 2 tbsp
  • Ginger - 1/4 inch
  • Toor dhal - 1 tbsp (soaked for 20 mins)
  • Green Chili - 1 No
  • Cumin seeds - 1 tsp
  • Pepper corn - 2 Nos
To Saute:
  • Oil - 2 tbsp
  • Mustard seeds - 1/2 tsp
  • Fenugreek seeds - 1 pinch
  • Bengal gram - 1/2 tsp
  • Dry chilli - 2 nos
  • Turmeric powder - 1/4 tsp
  • hing / Asafoetida - a pinch
  • Curry leaves - 1 twig
 
Method:
  1. Pressure the papaya with a pinch of tumeric powder and  salt.
  2. Grind all the items given for grinding in to smooth paste.
  3. Mix the grounded paste with the curd and beat well and add water as required and keep it as side.
  4. Heat the oil in a pan, add the items under To Saute one by one and fry
  5. To this add chopped onion and fry till it is slender and tomato, cooked papaya and salt to it and allow it to cook for 2 minutes.
  6. Now add the curd mix to it and when the bubbles starts appearing, switch it off and add few curry leaves to it.
Goes well with rice.


Thanks for visiting.

Sunday, March 31, 2013

Chana dhal Halwa

Hi friends,

It is time again to complete this month's challenge by SNC. May be I am the last one to complete it. This month's challenge for the south team was hosted by Kirti of north team - Chana dhal halwa. It was totally new to me. Scared to try this, as no one likes chana dhal in my family. But challenged myself this time.

Here i go with recipe

Ingredients:
Chana Dal/Chickpea/Bengal gram - 1 cup
Sugar - 3/4 cup
Ghee - 3/4 Cup
Milk - 2 cups
Cardamom powder - a pinch
Cashew chopped - 3 tbsp


Method:

  1. Wash and soak chana dhal for in water for 3~4 hours
  2. Pressure cook the chana dhal for 2 whistle and drain the excess water.
  3. In a pan, heata tbsp of ghee and fry the cashew and keep it aside.
  4. Now grind the cooked dhal into a coarse paste without water.
  5. Heat the ghee in a heavy bottomed pan and add dhal and stir it for 20 minutes untill the raw smell goes.
  6. Now add cup of milk to it and stir continuously till it becomes dry and now add the rest milk and repeat the same procedure
  7. Now add sugar, cardamom powder and cashew to it and stir fry it for 5 minutes. you will notice that the mixture rolling in the pan without sticking. 
  8. Now switch off the flame and transfer it into serving bowl.
  9. Chana dhal halwa is ready

Thanks to kirti, everyone in our family liked it and my husband didn't knew that it is made out of channa dhal until i revealed the secret. It is a great dessert and through SNC - i have learnt many recipes. thanks divya.

Thanks for visiting.


Babycorn fry

Ingredients:

  • Baby Corn - 200gm
  • Corn flour - 4 tbsp
  • Chilli Powder - 1 tbsp
  • Salt to taste
  • Cooking Soda - a pinch
  • Oil for deep frying

Method:

  1. Cut the babycorn into lengthwise
  2. Pressure the babycorn for 1 whistle by adding little salt and turmeric powder
  3. Strain the liquid and place the baby corn in a mixing bowl
  4. To this add corn flour, chilli powder, cooking soda and a little salt
  5. Mix well and deep fry it


Babycorn fry is ready.

Thanks for visiting.

Thursday, March 28, 2013

Jil Jil Jigarthanda

Hi Friends,
 
I feel lazy to write. I commited to Divya to try this recipe on seeing her post. Tried but never posted in my blog. Was busy with my crafts.

Now on to the post. On hearing this word "Jigarthanda"- Madurai comes to our mind. I haven't tasted it outside. Came to know about this recipe from my friend Divya Pramil. I have made this with rose milk powder instead of essence.
 
Ingredients
  • Milk - 1 litre
  • Edible gum / Almond gum - 2 tbsp
  • Rose milk powder - 6 tbsp
  • Sugar - 8 tbsp
  • Vanilla ice cream - 2~3 cups
 
Method:  
  • Soak almond gum in a large bowl of water for 6 ~7 hours. Then wash it twice if it tastes salty.
  • In a thick bottomed utensil, boil the milk until it reduces to 3/4 litre.
  • Now add sugar to it and allow it to boil for another 5 minutes and switch off the flame
  • Mix the rose milk powder to it and allow it cool to room temparature.
  • Now take a serving glass and put 2~3 tbsp of soaked almond gum and pour the rose milk to it and add one scoop of ice cream to it and mix well.
  • Now top up with one more scoop of ice cream.
Your Jil Jil Jigarthanda is ready.